Wednesday 10 February 2010

Tips for Taking Great Lightning Photos

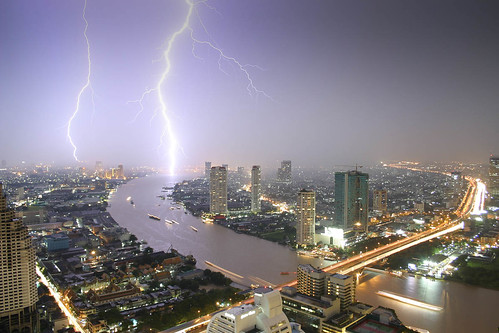
Lightning photos Lightning photos are very dramatic. The contrast between the night darkness and the lightning brightness results in very powerful photos. In this article we will provide you with a few tips and guidelines for successfully taking lightning photos.

The first thing to do when preparing for lightning photography is to set the camera to manual mode. Since all the preparations are done in a dark environment the camera can not automatically set the right focus, exposure and aperture.

Set the focus to manual and focus the camera on infinity. This is the right setting since lightning photography is done from long distance. Set the exposure to anywhere between a few seconds to a few minutes. The right exposure depends on the type of lightning – some lightning last a friction of a second while others can last a few seconds – and the distance from the lightning storm. Usually you would guess what the right exposure is and after the first lightning shot you would have to review the photo and correct the exposure as needed.

Remember to turn the flash unit off. Flash is not needed in lightning photography but if left in automatic mode the camera might fire it anyway due to the dark scene. The aperture should be set to a small value since lightning are very bright and with a small aperture they will still be more than visible in the photo.

Now that the camera is set you will need to choose the right scene for the photo – this is also referred to as framing the photo. To make lightning photos more interesting try to find contrast or objects that will be interesting when lit or stroked by lightning. Such objects could be trees, city sky line, roads or antenna towers. After your first lightning shot you should review the photo and make any needed corrections to the photo frame.

You can also play with other settings of the camera to achieve different effects. For example you can take photos with different white balance settings to achieve different color temperatures.
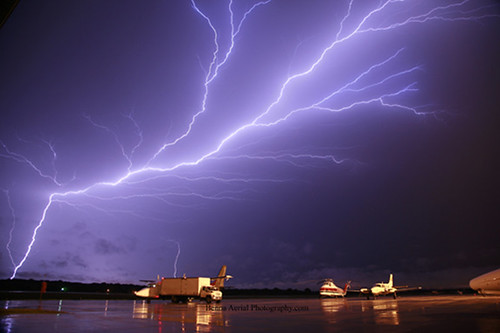
Remember that it can take a very long time to take one good lightning photo. Since there is no advanced notice as to when lightning strikes you will need to take photos continuously as the lightning storm is active. Be patient and make sure you are comfortable. Keep yourself dry have plenty of food and coffee and prepare for a shooting session that can last hours. After doing all the preparations and framing your photo the only thing to do is wait. Some luck can always be of help in getting this one perfect lightning photo.

And last but not least make sure that you are safe. Lightning can be dangerous. Make sure that you are not too close or in the heart of the storm. Avoid having metal objects around you or tall sharp objects. Remember that lightning strikes the highest object that can conduct its electrical current to the ground.

In conclusion taking good lightning photos is not hard. It takes a lot of patience some know-how of camera settings and regardless of your photography level it also takes a lot of luck.

Friday 5 February 2010

Black And White Digital Photography

There are several ways to achieve black and white digital photography. With black and white digital photography, you are bringing the end user back into a period of time when life seemed a lot simpler. Many digital cameras come equipped with a function to take these types of photos. If your digital camera does not support this function, you can still change your photographs into black and white with software programs.

You’ll want your black and white digital photography to look its best when you are finished. A technique that can help you get the best image out of your digital photograph is through image manipulation. You may find it better to convert your eight-bit color images (which are usually jpegs) into 16-bit colors first. This is important because an 8-bit RGB can be the same as a 10-bit grayscale.

You can find information all over on the Internet to help you with your black and white digital photography. These resources can be found in everything from websites to magazines. Colored pictures can look truly beautiful as a black and white display. You will usually have to convert your graphics, because although there are options with digital cameras, there are no true black and white digital cameras.

Correct the Colorcasts

An important part of black and white digital photography is correcting the colorcasts. These are caused by bad lighting, but you can use software such as PhotoShop Elements to make the relevant changes by using their editing applications. The Imaging Factory is also software that can help you to easily convert and fix lighting areas in your graphics to get the best look with your black and white digital photography. If you want to turn your graphics into black and white digital photography, you can step into a completely new dimension in photography. You can do an endless array of projects right from your own computer.

ISO Light and Quality

The ability to change ISO on digital cameras provides the professional (and amateur, if he knows enough about technology) photographer opportunity to create quality images virtually anywhere and anytime.

In a nutshell, ISO technology replaced the old ASA on cameras requiring film. With our older models, we had to change film with different ASA if we wanted a different speed of film. Now, our digital cameras allow us to change ISO on a settings menu with a turn of the dial. No change of film is required, and images are saved on the memory card regardless of ISO setting.

Digital cameras use image sensors instead of film, and ISO (International Standards Organization) simply denotes how sensitive the image sensor is to the amount of light present. If the ISO is set at a high level, for example, the image sensors are more sensitive and pictures can be taken in relatively little light. On the other hand, lower ISO settings are used when more light is available.

Most digital cameras today have an ‘ISO Auto’ mode, which simply put, means the camera will select a higher or lower ISO, depending on available light. For the amateur’s needs for ease of use and quality pictures, the auto mode works well most if not all the time. However the professional photographer will need to learn to manually select ISO for quality pictures.

If you are not depending on ‘ISO Auto’ mode, the light meter on the camera tells you when you need to change the ISO. If there is not enough light for good exposure, you have a choice of either using the flash mode or changing the ISO. Using flash may be the best choice for good exposure. On the other hand, if you are in a museum or facility that does not allow flash photography, you always have the option of selecting the next higher ISO setting and a faster shutter speed. Adjusting ISO usually requires an adjustment in shutter speed and aperture.

If you have more light than you need and are in danger of bleaching out the photo, lowering the ISO will lower the image sensors and exposure is more likely to result in good quality. Again, depending upon what you want to capture in the photo, you may also need to adjust shutter speed and f-stop (aperture).

Our message in this discussion is that understanding ISO and developing the ability to adjust it depending upon the scene you’re shooting is another valuable tool in your camera bag. Appropriately adjusting ISO to circumstances of light equals good quality pictures.

Sunday 31 January 2010

An Introduction to Pet Photography

Introduction Photographing your pet can be an incredibly rewarding experience. Done well, it will allow you to immortalize Fluffy or Spot - that significant member of your family - the pet that shared you food, chewed your shoes, and brought you the newspaper. In fact, the act of seriously photographing your pet will bring you both closer because the process opens you to noticing the small, wonderful things that you might have missed before - the way he wags his tail, etc. This is a grand adventure.

Goal As with anything, it's best to proceed with a goal in mind so you know where to start. What are you trying to accomplish? Are you trying to capture your pet's playful side? Are you trying to setup a funny photo using a prop such as a birthday hat? Is this an interactive portrait between your pet and your child? Sit down and put on paper this goal, because it will help you in preparing properly. Nothing is worse than spending an hour going to your favorite scene with equipment in hand and realizing your forgot a favorite toy - do your self a favor, do not skip this step.

Setting Now that you have decided on your goal, it's now time to decide the proper setting. Indoors vs. outdoors. Near the fireplace with an open fire in the background, or in a studio. At the beach or in the woods. As you think about the proper setting, think about how your pet will respond to that setting. If you decide the public park is the perfect place, you must think about your pet's resistance to distractions. Is he/she able to resist running after another animal or person? The more you know your pet and look through his/her eyes, the better off you will be.

Preparation Now you are at the critical preparation stage. You've set your goal, you've decided on the appropriate setting - let's try to anticipate all that can (and will) go wrong. I use the word 'wrong' loosely - try not be too rigid and to have fun - we will talk more about that in a minute. Write out on paper every possible thing you can think of. Here are some suggestions: · Exercise your pet - just enough so they are still alert, but not hyper · Lighting - outdoor is best, but flash will work too - should be natural lighting · Grooming - only if it doesn't adversely affect your pet's mood - then do it days beforehand · Props/Toys - favorite of the pet · Food - favorite of the pet · Be prepared for sudden movement - shutter speed about 1/125th and use iso 400 or 800 film (if indoors) · Watch the scene clutter · Have pet at least 6 feet away from background to reduce shadows · Bring an assistant to help manage your pet · Zoom Lens · Camera, Film, Tripod, Equipment, etc. Etc., etc. Are you getting the idea? The first time you make out your list, the process will be a little tedious, but the beauty is that once the list is made, all you need to do is modify it slightly for the next sessions.

On Location Whew, you've made to shooting location - congratulations. Hopefully, you've brought everything you are going to need, right? Right! Now, it's time for setup. Be organized; get everything laid out in a logical fashion. The last thing you want to be doing is fiddling around with equipment when you need to be shooting pictures - an animal has a zero attention span and you have got to be ready to snap that picture when the moment is there. How is you animal's demeanor? Is he/she super wound up? If yes, then perhaps some light exercise would be in order - nothing too heavy, but just enough to help him/her calm down. How are you? Are you stressed? Relax, and go with the flow - animals are super sensitive to your mood. Give your pet some last minute grooming - just touch-ups. If you are outdoors, how is the wind? Is it too strong? Is the sun too bright? Remember, overcast is much better for exposure. Make sure that your pet is far enough away from your background so as to not cast any shadows.

The Photographer's Mindset Your mindset should be one of peace and serenity. I can't overstate that enough. Also, you need to climb into the mind of your pet as best you can. What are they thinking and feeling? Align your expectations properly. If you have never done this before, don't expect perfection the first time out - that will just raise your anxiety level and will stress out your pet.

Shooting One of the most important things to remember is to get down on your pet's level, physically, as much as possible. A shot from above doesn't portray intimacy. In addition, when you are at your pet's level, it's easier for you to empathize with it. If you've never crawled around on the ground before, you might feel a bit foolish, but trust me, it makes all the difference in the world. Make sure that you and your handler work with each other - you have got to be in charge, but also try to be flexible - you have a lot of variables that you are managing.

Be patient, and have a lot of fun!!!

www.Kitten-Pictures.com

Wednesday 27 January 2010

Choosing the Right lens

How does auto-focus work?

All of us use it every time we click on the shutter button. Practically all modern cameras include some sort of an auto focus system. Thanks to the auto focus system we can enjoy an easier photography experience and can concentrate on composing the right photo and capturing the moment rather than on manually setting the focus.

Automatic focus though has its limitations. For example sometimes one might want to produce photos which are a bit fuzzy as an artistic expression. Also the auto focus implementation has its limitations and in some scenarios it might fail. One example is using a high end SLR camera with a passive auto focus system to take a picture of blue skies. In most cases the camera will move its motor back and forth and will eventually give up and fail to focus.

To better use the auto focus system it would help to understand high it actually works. Although implementations can vary we can divide them all into two categories: passive and active. Most pocket cameras use the cheaper passive method while high end professional cameras use either the active or a combination of both.

Passive auto focus:

Passive auto focus can be perceived as imitating how we set the focus manually. The camera defines one or more regions in the picture (usually they are marked as rectangles on the viewfinder or the LCD). The camera then analyzes the picture seen through those regions and calculates a Focus Level number. The camera then tries to move its lenses back and forth as it recalculates the Focus Level. The camera looks for a position where the Focus Level is the highest. For that point if the Focus Level is above a predefined threshold the camera would define this region of the photo as being in focus.

The Focus Level can be calculated in many ways. The common attribute of all calculations is figuring out how much Contrast is there in the photo. Although not in the scope of this article one way to calculate such a number is by running the photo through a high frequency filter – this is based on the fact that high contrast is associated with high frequencies.

Active auto focus:

Active auto focus works by measuring the distance between the camera and the object in the picture. Technically if you knew the exact distance to the object you are taking a picture of you could set the lens to the exact focus position. The active focus system shoots a beam of invisible light, usually infrared, at the object at the center of the picture and measures the distance to that object. Based on that distance the focus is set.

Combined auto focus:

Some high end cameras combine both systems. The camera will pick the right system for the specific scenario or will cross check and use both at the same time. The photographer can also decide manually to use one of the two options. For example when shooting blue skies the camera can try to use the active system and measure the distance. Since the distance is infinite the camera can set the focus and skip the passive focus. In other cases when the distance is not infinite the camera can use the active system to put the lens in approximately the right position and then use the passive system for fine tuning. In dark scenarios the camera can opt to use the active system since the passive one will not work.

So why doesn’t the auto focus work all the time?

Even with all the electronics and computing power in the camera there will always be scenarios where the camera auto focus fails. Failure can be when the camera can not focus and the picture is fuzzy or sometimes when the picture is actually in focus but the camera “thinks” that it is not.

What causes such cases? The list is long but here are just a few examples:

- Taking low light pictures: The passive auto focus system needs to “see” the picture in order to work and in low light scenarios this is not possible. Some systems use a series of flashes to overcome this limitation but this solution fails many times. An active system can measure the distance to the object in such scenarios but will fail if the object is not in the center of the picture or if there are a few objects at different distances.

- Active systems can fail with objects that tend to absorb the infrared beam they are using. Some materials absorb infrared beams and will cause the active system to measure the wrong distance. In some scenarios other infrared sources such as candles and open flame fires can render the active system useless.

- Low contrast objects such as white walls or blue skies. The passive auto focus relies on the fact that the Focus Level changes significantly when moving the lens back and forth. This allows the camera to settle on the right focus position. The Focus Level of low contrast objects does not change much and fails the passive system.

Knowing how the auto focus system works helps a photographer understand why sometimes the camera can not focus. In such scenarios the photographer can look for other solutions. Sometimes the photographer will have to use the manual focus. In other cases focusing on another object in the picture that is in the same distance but easier to focus on and locking the focus on that object will solve the problem.

Wednesday 20 January 2010

An Introduction_To_Black_And_White_Photography

You know, there is something that is definitely more artistic about black and white photography. I know I am getting a little away from the overall concept of digital photography. But as a photographer, you will no doubt run into the phenomenon that is black and white photography.

I can remember vividly a photography named Michael Zagaris who is the team photographer of the San Francisco 49ers. He said that he was just captivated by the use of black and white photography. The way the light and the shading are so much more evident. This helps contribute to the overall feeling and emotion of the moment that the black and white photo captures.

Some of you may be saying to yourselves that color photography has surely taken the place of black and white photography, and I would say that for the most part you are correct. An interesting note here is that black and white photography still holds a degree of nostalgia in most photographers, amateur and professional alike.Perhaps one reason for this nostalgia is of course that photography was first taken on black and white film. Not only that, but many photography students are tasked with taking black and white photos when they are in their first photography classes. I know in my first digital photography class I was astounded at the very idea. Only later when the photos were developed did I truly start to appreciate black and white photos.

Therefore if you are an amateur or even experienced photographer, I would encourage you to give black and white photography a try. I think you will be pleasantly surprised at the level of sophistication it takes to really pull off a great black and white photo. After that you may be able to take in some advanced photos such as adding one stream of color. You may have seen these kinds of photos before when the photographer allows one color to be very evident in a black and white photo. For instance I can remember a picture of a little girl in a black and white photo, but the coat she was wearing was bright pink. It was great moment to capture.

As for taking the black and white photos themselves, more advanced digital cameras have gray-scale mechanisms that allow to this. Also you can have the color picture converted by using a digital photography software such as "Photoshop." Give yourself a chance in black and white photography. I think you will be pleasantly surprised in the results.

Friday 15 January 2010

How does auto-focus work?

How does auto-focus work?

All of us use it every time we click on the shutter button. Practically all modern cameras include some sort of an auto focus system. Thanks to the auto focus system we can enjoy an easier photography experience and can concentrate on composing the right photo and capturing the moment rather than on manually setting the focus.

Automatic focus though has its limitations. For example sometimes one might want to produce photos which are a bit fuzzy as an artistic expression. Also the auto focus implementation has its limitations and in some scenarios it might fail. One example is using a high end SLR camera with a passive auto focus system to take a picture of blue skies. In most cases the camera will move its motor back and forth and will eventually give up and fail to focus.

To better use the auto focus system it would help to understand high it actually works. Although implementations can vary we can divide them all into two categories: passive and active. Most pocket cameras use the cheaper passive method while high end professional cameras use either the active or a combination of both.

Passive auto focus:

Passive auto focus can be perceived as imitating how we set the focus manually. The camera defines one or more regions in the picture (usually they are marked as rectangles on the viewfinder or the LCD). The camera then analyzes the picture seen through those regions and calculates a Focus Level number. The camera then tries to move its lenses back and forth as it recalculates the Focus Level. The camera looks for a position where the Focus Level is the highest. For that point if the Focus Level is above a predefined threshold the camera would define this region of the photo as being in focus.

The Focus Level can be calculated in many ways. The common attribute of all calculations is figuring out how much Contrast is there in the photo. Although not in the scope of this article one way to calculate such a number is by running the photo through a high frequency filter – this is based on the fact that high contrast is associated with high frequencies.

Active auto focus:

Active auto focus works by measuring the distance between the camera and the object in the picture. Technically if you knew the exact distance to the object you are taking a picture of you could set the lens to the exact focus position. The active focus system shoots a beam of invisible light, usually infrared, at the object at the center of the picture and measures the distance to that object. Based on that distance the focus is set.

Combined auto focus:

Some high end cameras combine both systems. The camera will pick the right system for the specific scenario or will cross check and use both at the same time. The photographer can also decide manually to use one of the two options. For example when shooting blue skies the camera can try to use the active system and measure the distance. Since the distance is infinite the camera can set the focus and skip the passive focus. In other cases when the distance is not infinite the camera can use the active system to put the lens in approximately the right position and then use the passive system for fine tuning. In dark scenarios the camera can opt to use the active system since the passive one will not work.

So why doesn’t the auto focus work all the time?

Even with all the electronics and computing power in the camera there will always be scenarios where the camera auto focus fails. Failure can be when the camera can not focus and the picture is fuzzy or sometimes when the picture is actually in focus but the camera “thinks” that it is not.

What causes such cases? The list is long but here are just a few examples:

- Taking low light pictures: The passive auto focus system needs to “see” the picture in order to work and in low light scenarios this is not possible. Some systems use a series of flashes to overcome this limitation but this solution fails many times. An active system can measure the distance to the object in such scenarios but will fail if the object is not in the center of the picture or if there are a few objects at different distances.

- Active systems can fail with objects that tend to absorb the infrared beam they are using. Some materials absorb infrared beams and will cause the active system to measure the wrong distance. In some scenarios other infrared sources such as candles and open flame fires can render the active system useless.

- Low contrast objects such as white walls or blue skies. The passive auto focus relies on the fact that the Focus Level changes significantly when moving the lens back and forth. This allows the camera to settle on the right focus position. The Focus Level of low contrast objects does not change much and fails the passive system.

Knowing how the auto focus system works helps a photographer understand why sometimes the camera can not focus. In such scenarios the photographer can look for other solutions. Sometimes the photographer will have to use the manual focus. In other cases focusing on another object in the picture that is in the same distance but easier to focus on and locking the focus on that object will solve the problem.