Wednesday 10 February 2010

Tips for Taking Great Lightning Photos

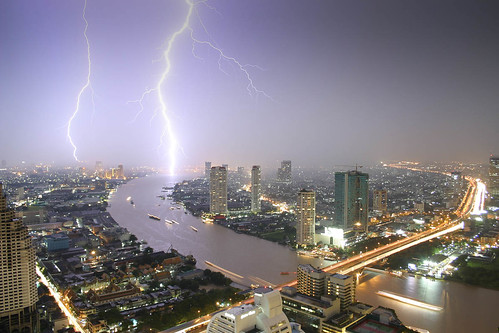
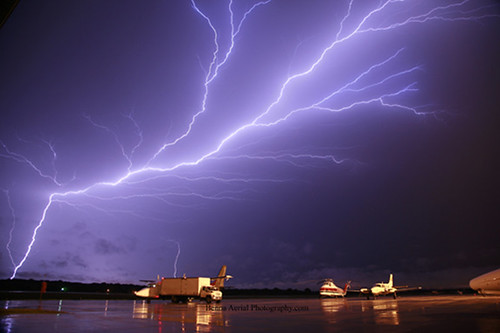
Lightning photos Lightning photos are very dramatic. The contrast between the night darkness and the lightning brightness results in very powerful photos. In this article we will provide you with a few tips and guidelines for successfully taking lightning photos.

The first thing to do when preparing for lightning photography is to set the camera to manual mode. Since all the preparations are done in a dark environment the camera can not automatically set the right focus, exposure and aperture.

Set the focus to manual and focus the camera on infinity. This is the right setting since lightning photography is done from long distance. Set the exposure to anywhere between a few seconds to a few minutes. The right exposure depends on the type of lightning – some lightning last a friction of a second while others can last a few seconds – and the distance from the lightning storm. Usually you would guess what the right exposure is and after the first lightning shot you would have to review the photo and correct the exposure as needed.

Remember to turn the flash unit off. Flash is not needed in lightning photography but if left in automatic mode the camera might fire it anyway due to the dark scene. The aperture should be set to a small value since lightning are very bright and with a small aperture they will still be more than visible in the photo.

Now that the camera is set you will need to choose the right scene for the photo – this is also referred to as framing the photo. To make lightning photos more interesting try to find contrast or objects that will be interesting when lit or stroked by lightning. Such objects could be trees, city sky line, roads or antenna towers. After your first lightning shot you should review the photo and make any needed corrections to the photo frame.

You can also play with other settings of the camera to achieve different effects. For example you can take photos with different white balance settings to achieve different color temperatures.

Remember that it can take a very long time to take one good lightning photo. Since there is no advanced notice as to when lightning strikes you will need to take photos continuously as the lightning storm is active. Be patient and make sure you are comfortable. Keep yourself dry have plenty of food and coffee and prepare for a shooting session that can last hours. After doing all the preparations and framing your photo the only thing to do is wait. Some luck can always be of help in getting this one perfect lightning photo.

And last but not least make sure that you are safe. Lightning can be dangerous. Make sure that you are not too close or in the heart of the storm. Avoid having metal objects around you or tall sharp objects. Remember that lightning strikes the highest object that can conduct its electrical current to the ground.

In conclusion taking good lightning photos is not hard. It takes a lot of patience some know-how of camera settings and regardless of your photography level it also takes a lot of luck.

Friday 5 February 2010

Black And White Digital Photography

There are several ways to achieve black and white digital photography. With black and white digital photography, you are bringing the end user back into a period of time when life seemed a lot simpler. Many digital cameras come equipped with a function to take these types of photos. If your digital camera does not support this function, you can still change your photographs into black and white with software programs.

You’ll want your black and white digital photography to look its best when you are finished. A technique that can help you get the best image out of your digital photograph is through image manipulation. You may find it better to convert your eight-bit color images (which are usually jpegs) into 16-bit colors first. This is important because an 8-bit RGB can be the same as a 10-bit grayscale.

You can find information all over on the Internet to help you with your black and white digital photography. These resources can be found in everything from websites to magazines. Colored pictures can look truly beautiful as a black and white display. You will usually have to convert your graphics, because although there are options with digital cameras, there are no true black and white digital cameras.

Correct the Colorcasts

An important part of black and white digital photography is correcting the colorcasts. These are caused by bad lighting, but you can use software such as PhotoShop Elements to make the relevant changes by using their editing applications. The Imaging Factory is also software that can help you to easily convert and fix lighting areas in your graphics to get the best look with your black and white digital photography. If you want to turn your graphics into black and white digital photography, you can step into a completely new dimension in photography. You can do an endless array of projects right from your own computer.

ISO Light and Quality

The ability to change ISO on digital cameras provides the professional (and amateur, if he knows enough about technology) photographer opportunity to create quality images virtually anywhere and anytime.

In a nutshell, ISO technology replaced the old ASA on cameras requiring film. With our older models, we had to change film with different ASA if we wanted a different speed of film. Now, our digital cameras allow us to change ISO on a settings menu with a turn of the dial. No change of film is required, and images are saved on the memory card regardless of ISO setting.

Digital cameras use image sensors instead of film, and ISO (International Standards Organization) simply denotes how sensitive the image sensor is to the amount of light present. If the ISO is set at a high level, for example, the image sensors are more sensitive and pictures can be taken in relatively little light. On the other hand, lower ISO settings are used when more light is available.

Most digital cameras today have an ‘ISO Auto’ mode, which simply put, means the camera will select a higher or lower ISO, depending on available light. For the amateur’s needs for ease of use and quality pictures, the auto mode works well most if not all the time. However the professional photographer will need to learn to manually select ISO for quality pictures.

If you are not depending on ‘ISO Auto’ mode, the light meter on the camera tells you when you need to change the ISO. If there is not enough light for good exposure, you have a choice of either using the flash mode or changing the ISO. Using flash may be the best choice for good exposure. On the other hand, if you are in a museum or facility that does not allow flash photography, you always have the option of selecting the next higher ISO setting and a faster shutter speed. Adjusting ISO usually requires an adjustment in shutter speed and aperture.

If you have more light than you need and are in danger of bleaching out the photo, lowering the ISO will lower the image sensors and exposure is more likely to result in good quality. Again, depending upon what you want to capture in the photo, you may also need to adjust shutter speed and f-stop (aperture).

Our message in this discussion is that understanding ISO and developing the ability to adjust it depending upon the scene you’re shooting is another valuable tool in your camera bag. Appropriately adjusting ISO to circumstances of light equals good quality pictures.